Fall Detection — Deployment Guide

View source on GitHub
Preset

reCamera 2002

A reCamera 2002 decides on-device whether someone fell and publishes the event over MQTT.

Important: this is an assistive alert, not a certified medical or life-safety system. Long shots, occlusion, low light and fall-like floor activities remain weak cases.
1

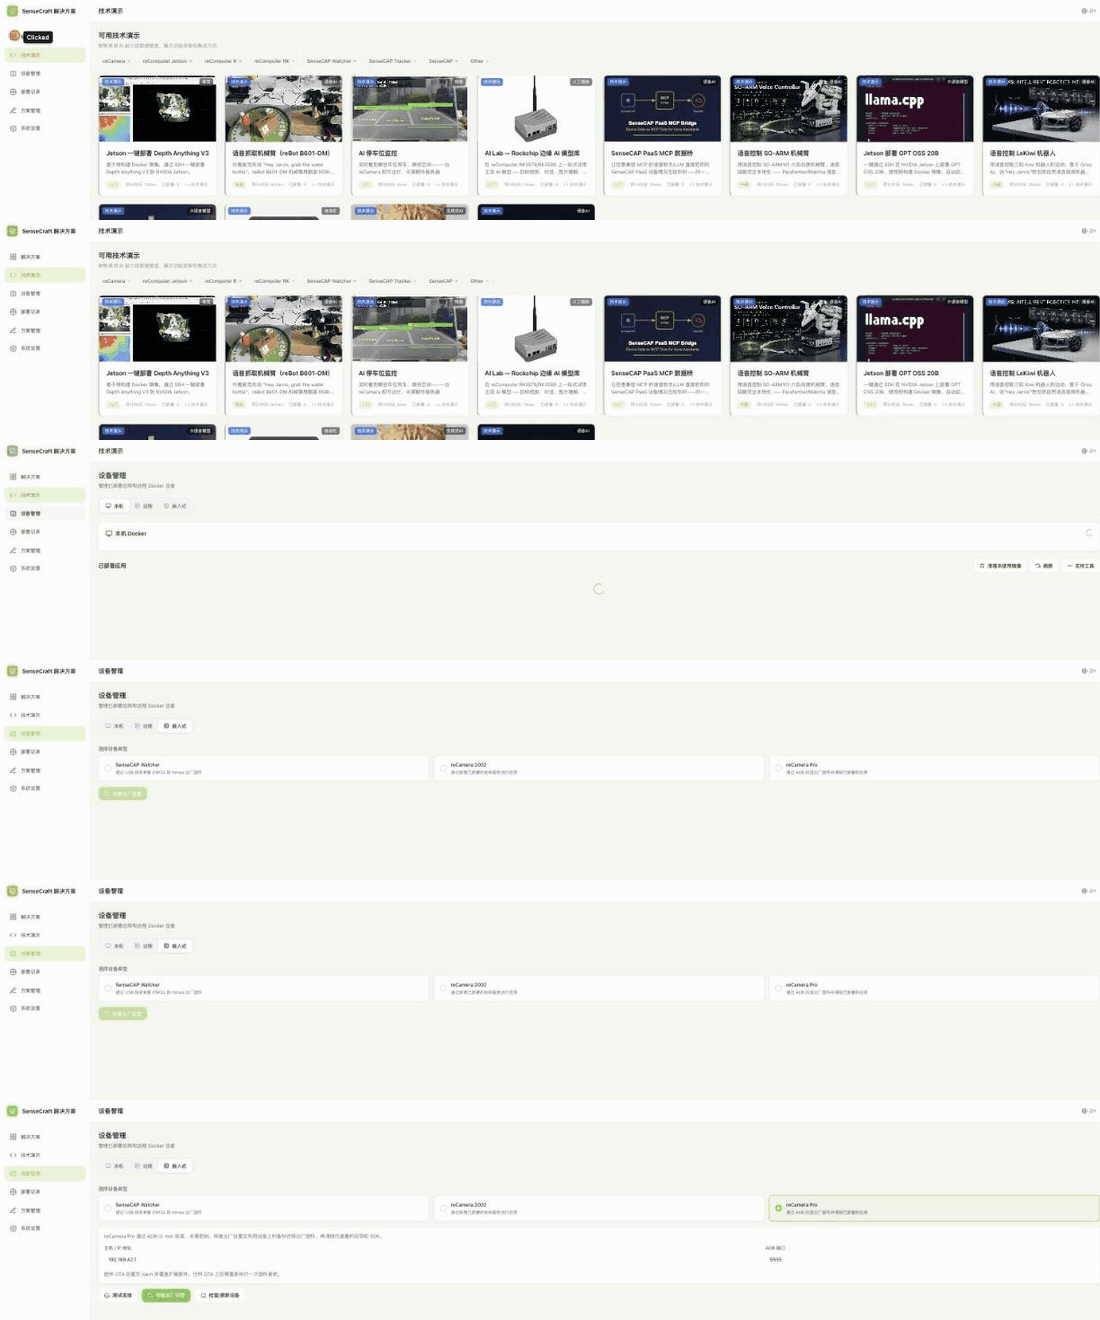
Update the reCamera Console

Install console 0.5.5, which manages the camera apps. Already current? It's skipped.

Prerequisites
  1. Connect the reCamera over USB, or put it on the same network as this computer.
  2. Over USB the address is 192.168.42.1; over Wi-Fi use the IP your router shows.
  3. The default password is recamera (older units use recamera.2).
  4. The next step, installing fall detection, needs this console version.
Troubleshooting
SymptomAction
Cannot connectConfirm SSH is enabled and the IP and password are correct
Console page does not load after installGive it 30 seconds to restart, then reload http://<camera-ip>/
Password rejectedTry recamera.2; units shipped with older firmware use it

2

Install Fall Detection

Install the pose model and the fall detector, then start it on the camera.

Wiring

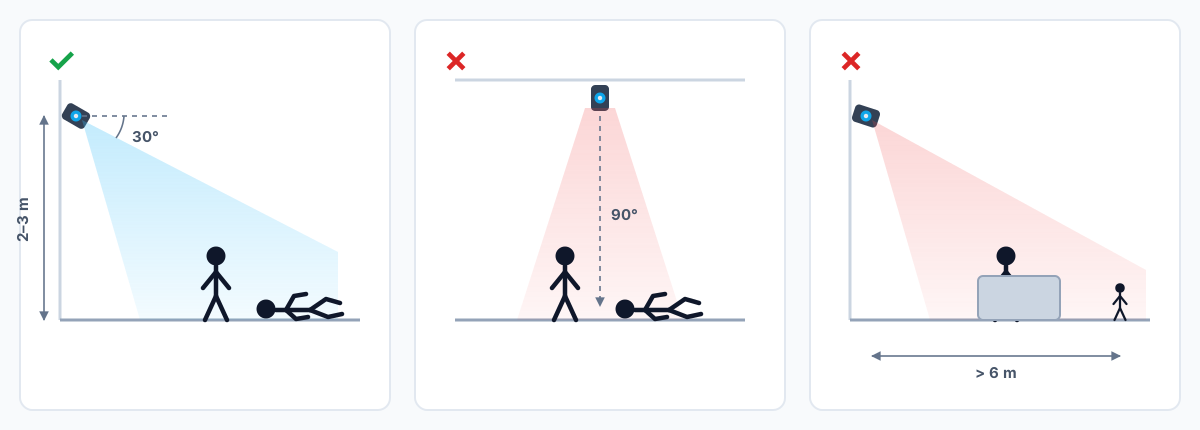
Camera placement: a side or corner view at 2–3 m works; straight-down and long-shot or occluded views do not.

  1. Mount the camera rigidly with a clear, wide view of the area you want covered.
  2. Keep the whole person — especially shoulders and hips — visible along the path where a fall would happen.
  3. Aim for a side or corner view of the floor area rather than looking straight down.
  4. Point it at circulation space, not primarily at a bed or an exercise area — everyday floor activities there read as falls until you have validated them separately.
  5. Expect it to detect the fall itself, not the aftermath: starting it while someone is already lying down reports the posture but raises no event.
Troubleshooting
SymptomAction
Service exits immediatelyAnother camera app is still running; only one app can hold the camera, so reboot and retry
Node-RED stopped working after installExpected — installing takes the camera from Node-RED and any other vision app
Falls are missedWiden the view, improve lighting, keep shoulders and hips visible before and after impact
Push-ups trigger an alertA known fall-like activity; change the view or add downstream human confirmation
No MQTT messagesConfirm port 1883 is reachable from your computer and the topic is recamera/fall-detection/results

3

Watch Fall Status

Click Connect to see the skeleton, the state and the event number live.

Troubleshooting
SymptomAction
Overlay appears before videoMQTT connects faster than RTSP; wait a few seconds
Skeleton disappears near the floorReframe the camera; a short post-impact gap is tolerated, long occlusion cannot be classified
No overlay at allConfirm MQTT port 1883 is reachable and the topic matches

After Deployment

Alerts go to recamera/fall-detection/results, and Home Assistant discovery creates fall state, event ID and person presence entities.

Quick verification

  1. Click Connect and wait for the video to appear.
  2. Walk into view — the skeleton should follow you and the card should read NORMAL.
  3. Lie down deliberately on the floor. Within roughly two seconds the card should turn red and show a new event number.

Next steps

  • Add the camera to Home Assistant — the entities appear automatically once your broker is shared with it.
  • Run a site acceptance test with representative falls and normal activity before enabling any notification workflow.
4

Install the Alarm Panel (optional)

Skip this step and the deployment is finished: the camera keeps publishing MQTT events and nothing else changes.

Take it and you install an alarm panel on a separate host: a site overview, zones drawn on the live picture, a no-person and a no-motion timeout per zone, operator confirm or dismiss for each alarm, an audit trail, and a webhook that carries no video.

Prerequisites

The panel goes on a separate box on the camera's network and needs no AI accelerator: a reComputer R1000 Series, or a Linux machine you already run.

  • A x86_64 or arm64 Linux host on the camera's network, with Docker and the compose plugin (docker compose version has to succeed) and SSH access.
  • The exact topic the cameras publish on. Check it from that host before you start: mosquitto_sub -h <camera-or-broker-ip> -t '#' -v. A reCamera 2002 publishes on <device-name>/fall-detection/results, single stream, no stream-id suffix.
  • Ports 8080 and 1883 free on that host, or different ports entered in the form.
Troubleshooting
SymptomAction
Deploy stops on "Port 8080 is already in use"Enter another Panel Port in the form, or stop the service the message names.
"no message on ... within 20 s" warning at the endThe panel is up but has seen no detector result. Re-check the topic against mosquitto_sub -t '#' -v, and that the camera publishes to the broker address entered here.
Alarm list stays empty and no-person alarms never fireThe camera has to publish on frames with nobody in view for that timeout to have an input. Falls still work either way.
pull access denied on eldercare-alarm-*Check that the host can reach the image registry.
Remote device

Deploy to the panel host over SSH.

What you will be asked for(filled in the SenseCraft Solution app)
  • Panel Host IP*

    The box that will run the panel — a reComputer R1000 or any existing Linux server with Docker

  • SSH Username*default recomputer
  • SSH Password*
  • Camera Model*default fall_result_v1
    2 options
    • · reCamera 2002
    • · reCamera Pro

    Which payload the cameras publish. reCamera 2002 sends fall_result_v1; reCamera Pro sends its own state message and needs the Pro adapter.

  • Detector Result Topic*default recamera/fall-detection/results

    The exact topic the cameras publish on. Confirm it with `mosquitto_sub -h <broker> -t '#' -v` before deploying — a 2002 uses <device-name>/fall-detection/results, a Pro uses <base>/fall-detection/state. A + wildcard covers several cameras.

  • MQTT Broker Host*default mosquitto

    Leave as mosquitto to use the broker this stack starts here, and point the cameras at this host. Enter the camera's or your own broker address to subscribe to an existing one instead.

  • MQTT Broker Port*default 1883

    The port the panel connects to. With the bundled broker this is the same value as the published broker port below.

  • MQTT Username

    Leave empty for the bundled broker, which accepts anonymous connections on the LAN

  • MQTT Password

    Quotes and backslashes are not accepted — the value is written into a quoted field in the generated configuration

  • Broker Port to Publish on This Host*default 1883

    The host port the bundled broker binds. Change it if 1883 is already taken on this machine — the deploy fails early with the name of the process holding it.

  • Panel Port*default 8080

    The host port the panel page is served on. Change it if 8080 is already taken.

  • Zone Name*default bedroom

    The area these cameras watch. The deploy creates one zone covering the whole frame; split it into sub-rectangles on the host afterwards if one camera covers two rooms.

  • No-person Timeout (minutes)*default 60

    How long the zone may stay empty before an alarm is raised. Set it above the longest normal absence — a bathroom zone needs a much shorter value than a bedroom.

  • No-motion Timeout (minutes)*default 30

    How long a person may stay in the zone without moving before an alarm is raised. Sleeping hours will trip this unless the zone excludes the bed or the value covers a nap.

  • Webhook URL

    Where a confirmed alarm is POSTed. The payload carries the alarm id, kind, zone, stream, timestamp and operator — no snapshot and no video. Leave empty to record alarms on the panel only.

5

Open the Alarm Panel

Only relevant if you installed the panel in the previous step.

Troubleshooting
SymptomAction
Page does not loadCheck the Panel Port matches what the deploy step used, and that the host firewall allows it.
A login screen appearsThe deployment set ELDERCARE_API_TOKEN. Enter that token plus an operator name — the name goes on confirm and dismiss receipts.
A room reads unknown and stream-lostThe panel host cannot reach that camera; check the network. The last-frame time on the card shows when a frame last arrived.
After Deployment

Quick verification

  • The overview page lists the room you named, with its camera and zone counts.
  • An empty alarm list on a quiet site is the correct result — it means the service is up and answering.
  • To prove the ingest path end to end, drop the zone's no-person timeout to one minute on the host (config/alarm-panel.yaml, then docker compose restart alarm-panel), leave the area empty, and confirm an alarm appears. Put the real value back afterwards.

Next steps

  • Draw the zones on the live picture instead of keeping the single whole-frame rectangle the deploy created.
  • Point the webhook at your own alerting system if you left it empty.
  • Voice check-in is off by default and needs an OpenVoiceStream instance plus a USB microphone and speaker on this host; see Step 6.
6

Voice Check-in (optional)

Optional, off by default. After a fall alarm is raised, the service asks the resident out loud whether they are all right and acts on the answer; turning it off leaves the alarm path unchanged.

What the answer does:

AnswerResult
A call for help ("救命", "help", "I can't get up")Confirmed immediately, skipping the rest of the operator window
No answer at allConfirmed immediately
Something unreadableConfirmed immediately
"I'm fine"Default on_ok: needs_review — the alarm keeps its normal timing and is flagged for a person to look at. Set on_ok: dismiss to close it instead
Prerequisites

An OpenVoiceStream instance on the same LAN, with a USB microphone and a speaker plugged into the box running it, not into the camera.

Troubleshooting
SymptomAction
Every alarm gets no_answerEither the prompt is inaudible, or the microphone is not being captured. Check the speaker first, then arecord -l on the alarm host.
Every alarm gets unclearASR is returning text the keyword lists do not match. Read the transcript in the console and add the phrasing the resident actually uses to ok_keywords / help_keywords.
Alarms close by themselveson_ok is set to dismiss. Put it back to needs_review unless a person really is reviewing the dismissals.
The service starts but never speaksConfirm the alarm host's audio device is passed into the container, and check docker compose logs eldercare-alarm for TTS or playback errors.
After Deployment

A distress word beats a safe word in the same sentence.

Privacy: audio is never written to disk. The audit trail keeps the verdict, confidence, latency and transcribed text; store_transcript: false drops the text. Notifications carry no snapshot and no video.

Quick verification

  1. curl -sf http://<ovs-host>:8621/readyz returns 200.
  2. The synthesized prompt is audible from where a fall would happen.